

Vue基础复习
Vue基础复习
vue介绍与描述(个人理解)
- 编码简洁,体积小,运行效率高
- 采用组件化模式,提高代码复用率、且让代码更好维护
- 声明式编码,让编码人员无需直接操作DOM,提高开发效率
- 使用虚拟DOM 和 Diff算法,尽量复用DOM节点
- vue还有大量的周边来配合使用,方便开始开发
Vue基础语法
插值表达式
用于解析标签体内容
{{xxx}},xxx 是 js 表达式,可以直接读取到 data 中的所有区域
指令语法
用于解析标签(包括:标签属性、标签体内容、绑定事件…)
举例:或简写为,xxx 同样要写 js 表达式,可以直接读取到 data 中的所有属性
数据绑定:v-bind/v-model
Vue中有2种数据绑定的方式
单向绑定v-bind:数据只能从 data 流向页面
双向绑定v-model:数据不仅能从 data 流向页面,还可以从页面流向 data
计算属性:computed
要用的属性不存在,需要通过已有属性计算得来;底层借助了Objcet.defineProperty()方法提供的getter和setter
- get函数什么时候执行?
- 初次读取时会执行一次
- 当依赖的数据发生改变时会被再次调用
优势:与methods实现相比,内部有缓存机制(复用),效率更高,调试方便
计算属性最终会出现在vm上,直接读取使用即可
如果计算属性要被修改,那必须写set函数去响应修改,且set中要引起计算时依赖的数据发生改变
如果计算属性确定不考虑修改,可以使用计算属性的简写形式
写法如下:
1 | computed: { |
侦听属性:watch
当被监视的属性变化时,回调函数自动调用,进行相关操作
监视的属性必须存在,才能进行监视,既可以监视data,也可以监视计算属性
配置项属性immediate:false,改为 true,则初始化时调用一次 handler(newValue,oldValue)
写法如下:
1 | // isHot必须在data或者computed中存在 |
样式绑定::class/:style
:class=”xxx”/:style=”xxx”,xxx 可以是字符串、数组、对象
字符串写法常用于:条件判断切换类名,或动态获取样式
数组写法常用于:动态获取多个样式类名
对象写法常用于:动态获取多个样式(通常是内联样式)
条件渲染:v-if/v-show
v-if 切换频率较低的场景,因为不展示的DOM元素直接被移除
写法:
- v-if=”表达式”
- v-else-if=”表达式”
- v-else
v-show 切换频率较高的场景,不展示的DOM元素未被移除,仅仅是使用样式隐藏掉display: none
写法:
- v-show=”表达式”
注意点:使用v-if的时,元素可能无法获取到,而使用v-show一定可以获取到
列表渲染:v-for
v-for指令 用于展示列表数据
写法:
<li v-for="(item, index) of items" :key="index">,这里key可以是index,更好的是遍历对象的唯一标识
可遍历:数组、对象、字符串、指定次数
过滤器:filter
对要显示的数据进行特定格式化后再显示
使用过滤器:{{ xxx | 过滤器名}} 或 v-bind:属性 = "xxx | 过滤器名"
1 | // 全局过滤器 |
内置指令
v-bind:单向绑定解析表达式,可简写为:
v-model:双向数据绑定
v-for:遍历数组 / 对象 / 字符串
v-on:绑定事件监听,可简写为@
v-show:条件渲染
v-if:条件渲染
v-else-if:条件渲染
v-else:条件渲染
v-text:向其所在的节点中渲染文本内容
v-html:向指定节点中渲染包含html结构的内容
v-cloak:本质是一个特殊属性,Vue实例创建完毕并接管容器后,会删掉v-cloak属性
通常会配合样式使用
1
2
3[v-cloak] {
display:none;
}
v-once:所在节点在初次动态渲染后,就视为静态内容了,以后数据的改变不会引起v-once所在结构的更新,可以用于优化性能
v-pre:可利用它跳过:没有使用指令语法、没有使用插值语法的节点,会加快编译
自定义指令
对普通 DOM 元素进行底层操作
局部自定义指令
1 | directives:{ |
全局自定义指令
1 | Vue.directive(指令名, 配置对象) |
钩子函数的参数:
el:指令所绑定的元素,可以用来直接操作 DOM。binding:一个对象,包含以下 property:name:指令名,不包括v-前缀。value:指令的绑定值,例如:v-my-directive="1 + 1"中,绑定值为2。oldValue:指令绑定的前一个值,仅在update和componentUpdated钩子中可用。无论值是否改变都可用。expression:字符串形式的指令表达式。例如v-my-directive="1 + 1"中,表达式为"1 + 1"。arg:传给指令的参数,可选。例如v-my-directive:foo中,参数为"foo"。modifiers:一个包含修饰符的对象。例如:v-my-directive.foo.bar中,修饰符对象为{ foo: true, bar: true }。
vnode:Vue 编译生成的虚拟节点。移步 VNode API 来了解更多详情。oldVnode:上一个虚拟节点,仅在update和componentUpdated钩子中可用。
案例:默认聚焦状态(回调函数)
1 | // 局部 |
案例:默认聚焦状态(配置对象)
1 | // 局部 |
修饰符
触发特殊的事件/行为,从而达到一定的效果,并且可以连用
表单修饰符
| 修饰符名称 | 效果 |
|---|---|
| .lazy | 默认是数据发生改变的时候同步,使用.lazy则是焦点发生改变时同步 |
| .number | 默认的数据是字符串,使用.number可以转换为数字 |
| .trim | 自动过滤用户输入的首尾空白字符 |
事件修饰符
| 名称 | 可用版本 | 可用事件 | 说明 |
|---|---|---|---|
| .stop | 所有 | 任意 | 当事件触发时,阻止事件冒泡 |
| .prevent | 所有 | 任意 | 当事件触发时,阻止元素默认行为 |
| .capture | 所有 | 任意 | 当事件触发时,阻止事件捕获 |
| .self | 所有 | 任意 | 限制事件仅作用于节点自身 |
| .once | 2.1.4以上 | 任意 | 事件被触发一次后即解除监听 |
| .passive | 2.3.0以上 | 滚动 | 移动端,限制事件用不调用preventDefault()方法 |
例如
@submit.prevent="submit"
按键修饰符@keyup
| 别名修饰符 | 键值修饰符 | 对应按键 |
|---|---|---|
| .delete | .8/.46 | 回格 / 删除 |
| .tab | .9 | 制表 |
| .enter | .13 | 回车 |
| .esc | .27 | 退出 |
| .space | .32 | 空格 |
| .left | .37 | 左 |
| .up | .38 | 上 |
| .right | .39 | 右 |
| .down | .40 | 下 |
例如:
@keyup.13="console.log($event)"或者@keyup.enter=""
鼠标修饰符
| 修饰符 | 可用版本 | 对应按键 |
|---|---|---|
| .left | 2.2.0 以上 | 左键 |
| .right | 2.2.0 以上 | 右键 |
| .middle | 2.2.0 以上 | 中键 |
组合修饰符
| 修饰符 | 可用版本 | 对应按键 |
|---|---|---|
| .ctrl | 2.1.0 以上 | Ctrl键 |
| .alt | 2.1.0 以上 | Alt键 |
| .shift | 2.1.0 以上 | Shift键 |
| .meta | 2.1.0 以上 | meta键(Windows系统键盘上为田键) |
生命周期
Vue在关键时刻帮我们调用的一些特殊名称的函数
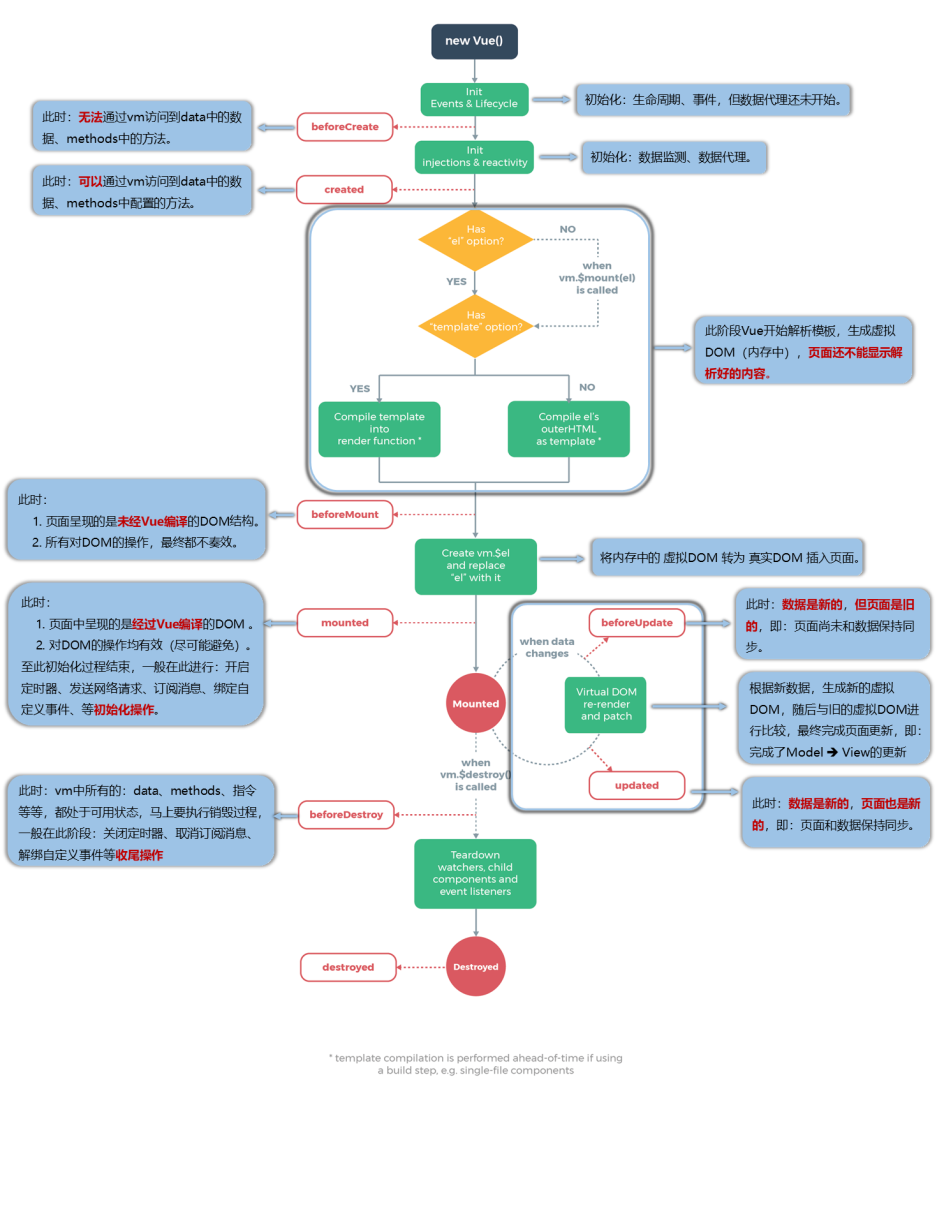
生命周期函数中的 this 指向是vm或组件实例对象
mounted发送ajax请求、启动定时器、绑定自定义事件、订阅消息等初始化操作
beforeDestroy清除定时器、解绑自定义事件、取消订阅消息等收尾工作
组件
组件是可复用的 Vue 实例
定义组件名
使用 kebab-case
1 | Vue.component('my-component-name', { /* ... */ }) |
使用 PascalCase
1 | Vue.component('MyComponentName', { /* ... */ }) |
组件注册
1 | // 全局注册 |
组件传值
prop(父传子)
prop大小写
prop的大小写是不敏感的,及时在定义时使用驼峰命名,在使用时必须换成短横线分割命名
Prop 类型
1 | props: { |
prop传值
列举的都需要在对应的组件定义,为了方便此处省略
字符串:直接传
1
<blog-post title="My journey with Vue"></blog-post>
数字:使用v-bind
1
<blog-post v-bind:likes="42"></blog-post>
布尔:使用v-bind
1
<blog-post v-bind:is-published="false"></blog-post>
数组:使用v-bind
1
<blog-post v-bind:comment-ids="[234, 266, 273]"></blog-post>
对象:使用v-bind
1
2
3
4
5
6<blog-post
v-bind:author="{
name: 'Veronica',
company: 'Veridian Dynamics'
}"
></blog-post>property
1
2
3
4
5
6
7
8
9
10
11
12// data中的数据
post: {
id: 1,
title: 'My Journey with Vue'
}
<blog-post v-bind="post"></blog-post>
等价于
<blog-post
v-bind:id="post.id"
v-bind:title="post.title"
></blog-post>
单选数据流
防止从子组件意外变更父级组件的状态,从而导致你的应用的数据流向难以理解。如果直接操作浏览器会在控制台警告!
如果我们需要改变子组件接收的数据,就在data或computed中保存
1 | props: ['initialCounter'], |
Prop 验证
对接收的数据指定验证要求
1 | props: { |
自定义事件(子传父)
1 | // 子组件创建对应的事件 |
插槽:slot
让父组件可以向子组件指定位置插入html结构,也是一种组件间通信的方式,适用于 父组件 ===> 子组件
分类:默认插槽、具名插槽、作用域插槽
使用方式:
默认插槽
1
2
3
4
5
6
7
8
9
10
11父组件中:
<Category>
<div>html结构1</div>
</Category>
子组件中:Category
<template>
<div>
<!-- 定义插槽 -->
<slot>插槽默认内容...</slot>
</div>
</template>具名插槽:父组件指明放入子组件的哪个插槽slot=”footer”,如果是template可以写成v-slot:footer
1
2
3
4
5
6
7
8
9
10
11
12
13
14
15
16
17
18父组件中:
<Category>
<template slot="center">
<div>html结构1</div>
</template>
<template v-slot:footer>
<div>html结构2</div>
</template>
</Category>
子组件中:
<template>
<div>
<!-- 定义插槽 -->
<slot name="center">插槽默认内容...</slot>
<slot name="footer">插槽默认内容...</slot>
</div>
</template>作用域插槽:scope用于父组件往子组件插槽放的html结构接收子组件的数据
数据在组件的自身,但根据数据生成的结构需要组件的使用者来决定(games数据在Category组件中,但使用数据所遍历出来的结构由App组件决定)
1
2
3
4
5
6
7
8
9
10
11
12
13
14
15
16
17
18
19
20
21
22
23
24
25
26
27
28
29
30
31
32
33
34
35父组件中:
<Category>
<template scope="scopeData">
<!-- 生成的是ul列表 -->
<ul>
<li v-for="g in scopeData.games" :key="g">{{g}}</li>
</ul>
</template>
</Category>
<Category>
<template slot-scope="scopeData">
<!-- 生成的是h4标题 -->
<h4 v-for="g in scopeData.games" :key="g">{{g}}</h4>
</template>
</Category>
子组件中:
<template>
<div>
<slot :games="games"></slot>
</div>
</template>
<script>
export default {
name:'Category',
props:['title'],
//数据在子组件自身
data() {
return {
games:['红色警戒','穿越火线','劲舞团','超级玛丽']
}
},
}
</script>
全局事件总线
一种可以在任意组件间通信的方式
这个对象必须能够使用$on$emit$off方法去绑定、触发和解绑事件
定义全局事件总线
1 | import Vue from 'vue' |
接收和销毁
1 | <template> |
发送
1 | <template> |
ref、mixin、插件、scoped
ref
应用在html标签上获取的是真实DOM元素,应用在组件标签上获取的是组件实例对象vc
打标识:
或获取:this.$refs.xxx
mixin 混入
可以把多个组件共用的配置提取成一个混入对象(个人不建议使用,容易把简单事情复杂化)
1 | var mixin = { |
插件
用于增强Vue
1 | Vue.use(名称,值) |
例如VueRouter
1 | import Vue from 'vue' |
scoped样式
让样式在局部生效,防止冲突
1 | <style scoped> |
$nextTick
this.$nextTick(回调函数)在下一次DOM更新结束后执行其指定的回调
什么时候用:当改变数据后,要基于更新后的新DOM进行某些操作时,要在nextTick所指定的回调函数中执行
过渡与动画
vue 在插入、更新或者移除 DOM 时,提供多种不同方式的应用过渡效果。
通常配合一些css或js的动画库:Animate.css、 Velocity.js等
过渡的类名
在进入/离开的过渡中,会有 6 个 class 切换。
v-enter:定义进入过渡的开始状态。在元素被插入之前生效,在元素被插入之后的下一帧移除。v-enter-active:定义进入过渡生效时的状态。在整个进入过渡的阶段中应用,在元素被插入之前生效,在过渡/动画完成之后移除。这个类可以被用来定义进入过渡的过程时间,延迟和曲线函数。v-enter-to:2.1.8 版及以上定义进入过渡的结束状态。在元素被插入之后下一帧生效 (与此同时v-enter被移除),在过渡/动画完成之后移除。v-leave:定义离开过渡的开始状态。在离开过渡被触发时立刻生效,下一帧被移除。v-leave-active:定义离开过渡生效时的状态。在整个离开过渡的阶段中应用,在离开过渡被触发时立刻生效,在过渡/动画完成之后移除。这个类可以被用来定义离开过渡的过程时间,延迟和曲线函数。v-leave-to:2.1.8 版及以上定义离开过渡的结束状态。在离开过渡被触发之后下一帧生效 (与此同时v-leave被删除),在过渡/动画完成之后移除。
对于这些在过渡中切换的类名来说,如果你使用一个没有名字的 <transition>,则 v- 是这些类名的默认前缀。如果你使用了 <transition name="my-transition">,那么 v-enter 会替换为 my-transition-enter。
案例
1 | <div id="example-2"> |
1 | // css |
路由:vue-router
基本写法
1 | import VueRouter from 'vue-router' // 引入VueRouter |
多级路由
1 | routes:[ |
路由跳转
跳转方式
- router-link标签
- this.$reuter.push()/replace()
无痕浏览/forward()前进/back()后退/go(n)指定n
携带参数
- params
- /xxx/:xxx/:xxx
有?是可选 - {name:””,params:{xxx:’abc’,xxx:123}}
- /xxx/:xxx/:xxx
- query
- /xxx/xxx
在路径后面跟着 - {path:””,query:{xxx:’abc’,xxx:123}}
- /xxx/xxx
- props(在组件内需要使用props接收)
- props:true
需要映射,所有params参数 - props:{a:1,b:2}
只能映射非params/query参数 - props:route=>({name:route.params.name,age:route.query.age,xxx:123})
指定任何方式
- props:true
- meta
- params
路由重复跳转
1
2
3
4
5
6
7Vue.use(Router)
//获取原型对象上的push函数
const originalPush = Router.prototype.push
//修改原型对象中的push方法
Router.prototype.push = function push(location) {
return originalPush.call(this, location).catch(err => err)
}
路由守卫
router.beforeEach
全局前置守卫to: 即将要进入的目标from: 当前导航正要离开的路由next:错误来源
router.afterEach
全局后置钩子to: 即将要进入的目标from: 当前导航正要离开的路由 /
路由独享的守卫
- 你可以直接在路由配置上定义
beforeEnter守卫
- 你可以直接在路由配置上定义
组件内部使用
1
2
3
4
5
6
7
8
9
10
11
12
13
14
15beforeRouteEnter(to, from) {
// 在渲染该组件的对应路由被验证前调用
// 不能获取组件实例 `this` !
// 因为当守卫执行时,组件实例还没被创建!
},
beforeRouteUpdate(to, from) {
// 在当前路由改变,但是该组件被复用时调用
// 举例来说,对于一个带有动态参数的路径 `/users/:id`,在 `/users/1` 和 `/users/2` 之间跳转的时候,
// 由于会渲染同样的 `UserDetails` 组件,因此组件实例会被复用。而这个钩子就会在这个情况下被调用。
// 因为在这种情况发生的时候,组件已经挂载好了,导航守卫可以访问组件实例 `this`
},
beforeRouteLeave(to, from) {
// 在导航离开渲染该组件的对应路由时调用
// 与 `beforeRouteUpdate` 一样,它可以访问组件实例 `this`
},history与hash路由的区别
区别
history没有#,刷新携带路由,默认404,需要配置返回首页
开发环境:脚手架默认配置好了
1
2
3devServer:{
historyApiFallback:true
}生产环境
配置Nginx
1
2
3location/{
try_files $uri $uri / /index.html;
}
hash:路由携带#,刷新不会携带路径,请求总是根路径,返回首页,没有404
原理
- history:使用history对象的pushState()和replaceState()
H5新增 - hash:使用location对象的hash
- history:使用history对象的pushState()和replaceState()
路由跳转滚动条回到顶部
1 | new VueRouter({ |
缓存路由组件
作用:让不展示的路由组件保持挂载,不被销毁
1 | // 缓存一个路由组件 |
Vuex
用于共享数据

安装
1 | npm install vuex --save |
注册
1 | import Vue from 'vue' |
常用配置
1 | import Vue from 'vue' //引入vue |
使用state
1 | #1 this.$store.state.数据属性 |
使用getters方法
相当于 computed
1 | #引入辅助函数 |
使用vuex 的方法 Mutations
Mutations里面 是同步改变state值的方法
1 | #方法1 |
使用vuex 的方法 Actions
1 | export default new Vuex.Store({ //输出一个 vuex的仓库实例 |
使用vuex 的 模块化module
1 | # shopcar.js |
1 | # store/index.js |
- 使用
1 | export default { |
vuex使用数据/方法
常规(无模块)
无辅助函数
state:this.$store.state.数据
getters:this.$store.getters.数据
actions:this.$store.dispatch(‘actions方法名’,所传值);
mutations:this.$store.commit(‘mutations方法名’,所传值);
有辅助函数 key自定义名称,value对应vuex中数据/方法并且是字符串
state:mapState({key:value}) / mapState([value])
getters:mapGetters({key:value}) / mapGetters([value])
actions:mapActions({key:value}) / mapActions([value])
mutations:mapMutations({key:value}) / mapMutations([value])
分模块并开启命名空间
无辅助函数
state:this.$store.state.模块名称.数据
getters:this.$store.getters.模块名称.数据
actions:this.$store.dispatch(‘模块名称/actions方法名’,所传值);
mutations:this.$store.commit(‘模块名称/mutations方法名’,所传值);
有辅助函数 key自定义名称,value对应vuex中数据/方法并且是字符串,模块名称是字符串
state:mapState(模块名称,{key:value}) / mapState(模块名称,[value])
getters:mapGetters(模块名称,{key:value}) / mapGetters(模块名称,[value])
actions:mapActions(模块名称,{key:value}) / mapActions(模块名称,[value])
mutations:mapMutations(模块名称,{key:value}) / mapMutations(模块名称,[value])